File conversion overview
Interactive Whiteboard supports file conversion from PPT and PPTX files into dynamic HTML web pages. The generated web pages can be accessed directly or presented on the whiteboard.
Interactive Whiteboard released a new version of file conversion service on July 27, 2022, that greatly improves conversion speed, content parsing, and stability. The new version also adds the ability to integrate with third-party whiteboard SDKs. Agora strongly recommends you use the new version of file conversion. See File conversion RESTful API reference.
Introduction
File conversion is implemented by Agora's server for Interactive Whiteboard service. When an app client requests to convert a file, your app server calls the Interactive Whiteboard RESTful API to send the request to the Agora server. The completes process is illustrated in the following diagram:
The file-conversion feature supports the following types of file conversion:
- Static-file conversion
- Dynamic-file conversion
Static-file conversion
Static-file conversion refers to converting PPT, PPTX, DOC, DOCX, and PDF files to static images in PNG or JPG/JPEG formats. The generated file does not preserve animations present in the source file.
When using static-file conversion, pay attention to the following issues:
- The conversion process works best when the source file is less than 50 pages long. If the source file has more than 100 pages, you may experience a conversion timeout.
- The higher the image resolution in the source file, the slower the conversion.
- PDF files generate the most accurate images when converted. If the generated image differs greatly from the source file in content or formatting, convert the source file to PDF and try again.
- Note that because this feature is implemented with support from Aspose, Agora might not be able to respond to requests for customization as quickly as usual. Agora recommends that you run sufficient tests of the file-conversion feature. If the test result do not meet your expectations, consider using a third-party service.
- The new file conversion currently does not support generating resource packages. However, because the resources path is fixed, users can download resources by themselves.
Dynamic-file conversion
Dynamic-file conversion refers to converting PPT/PPTX files edited with Microsoft Office to HTML web pages. The generated file preserves animations present in the source file.
When using dynamic-file conversion, pay attention to the following issues:
- Converting WPS files is not yet supported. You might also encounter problems when using PPTX files converted from WPS files.
- The new file conversion currently does not support generating resource packages. However, because the resources path is fixed, users can download resources by themselves.
- If a font is missing in a generated web page, you can either use the SDK to add a custom font or contact support@agora.io.
- Due to inherent constrains in the PPT file format, PPT files are converted into PPTX files at the backend before parsing, which might encounter failure. Therefore, Agora recommends you to upload PPTX files for conversion.
- A generated web page can be rendered into canvas pages via Fastboard SDK (coming soon), @netless/slide, or @netless/projector-plugin. The differences between these three rendering solutions are as follows:
- Fastboard SDK is the rendering plan designed for multi-window scenarios in Agora Interactive Whiteboard. Fastboard SDK is coming soon.
- @netless/slide is a stand-alone document conversion and rendering dependency that does not include such things as whiteboards or state synchronization. Adopting this solution requires you to write extra codes to synchronize states. It is designed for scenarios where PPT is used alone in whiteboard apps.
- @netless/projector-plugin is a plug-in for Whiteboard SDK that supports state synchronization, but it only works in single-window scenarios.
Version comparison
Compared with the old version, the new file conversion adopts an engine developed by Agora and has the following advantages:
- Support for stand-alone access. The new file conversion is no longer bound to Interactive Whiteboard and can be integrated with third-party whiteboard SDKs.
- Faster conversion speed. The conversion speed of the new version is increased by 200% to 400%.
- Stronger content parsing. The new file conversion supports parsing content that the old version cannot, including additional animations, filters, and other effects. The new version can parse all normal PPTX content.
- Improved stability. The new file conversion fixes multiple issues in the old version that could cause conversion failures.
- New features. Users can now pause ongoing conversion tasks or adjust task priorities.
The new and the old versions of file conversion are independent of each other: The conversion task UUID generated by the new version cannot call the old version to query the progress, while the uuid generated by the old version cannot query the progress through the new version. If you want to query the progress of the old conversion tasks through the new version, contact support@agora.io.
Although Agora Interactive Whiteboard continues to maintain the old version of file conversion, some issues could arise due to inherent limits in the architectural design. Agora recommends you choose an appropriate time to switch to the new file conversion. If you need support for the old version of file conversion, see the following resources:
Prerequisites
Before using file conversion, ensure that you have completed the following steps:
Create a third-party cloud storage account
To save files generated by file conversion, you need an account on a third-party cloud storage service such as Amazon S3, Google Cloud platform, or Alibaba.
Upload the source file
Before you launch a file-conversion task, you must upload the source file to a third-party cloud storage space or your Nginx server. This produces a URL address for the file. Make sure that the Interactive Whiteboard can access the file via this URL address.
Enable file conversion
Refer to the following steps:
-
Go to the Project Management page in Agora Console, find the project that has the whiteboard feature enabled, and click Configure.
-
On the Edit Project page, find Whiteboard, and click Config.
-
Under Services, select a data center, and click Config. The data center must be the same as the one you fill in the
regionfield when calling the Create a room API, otherwise, the service configurations do not take effect. -
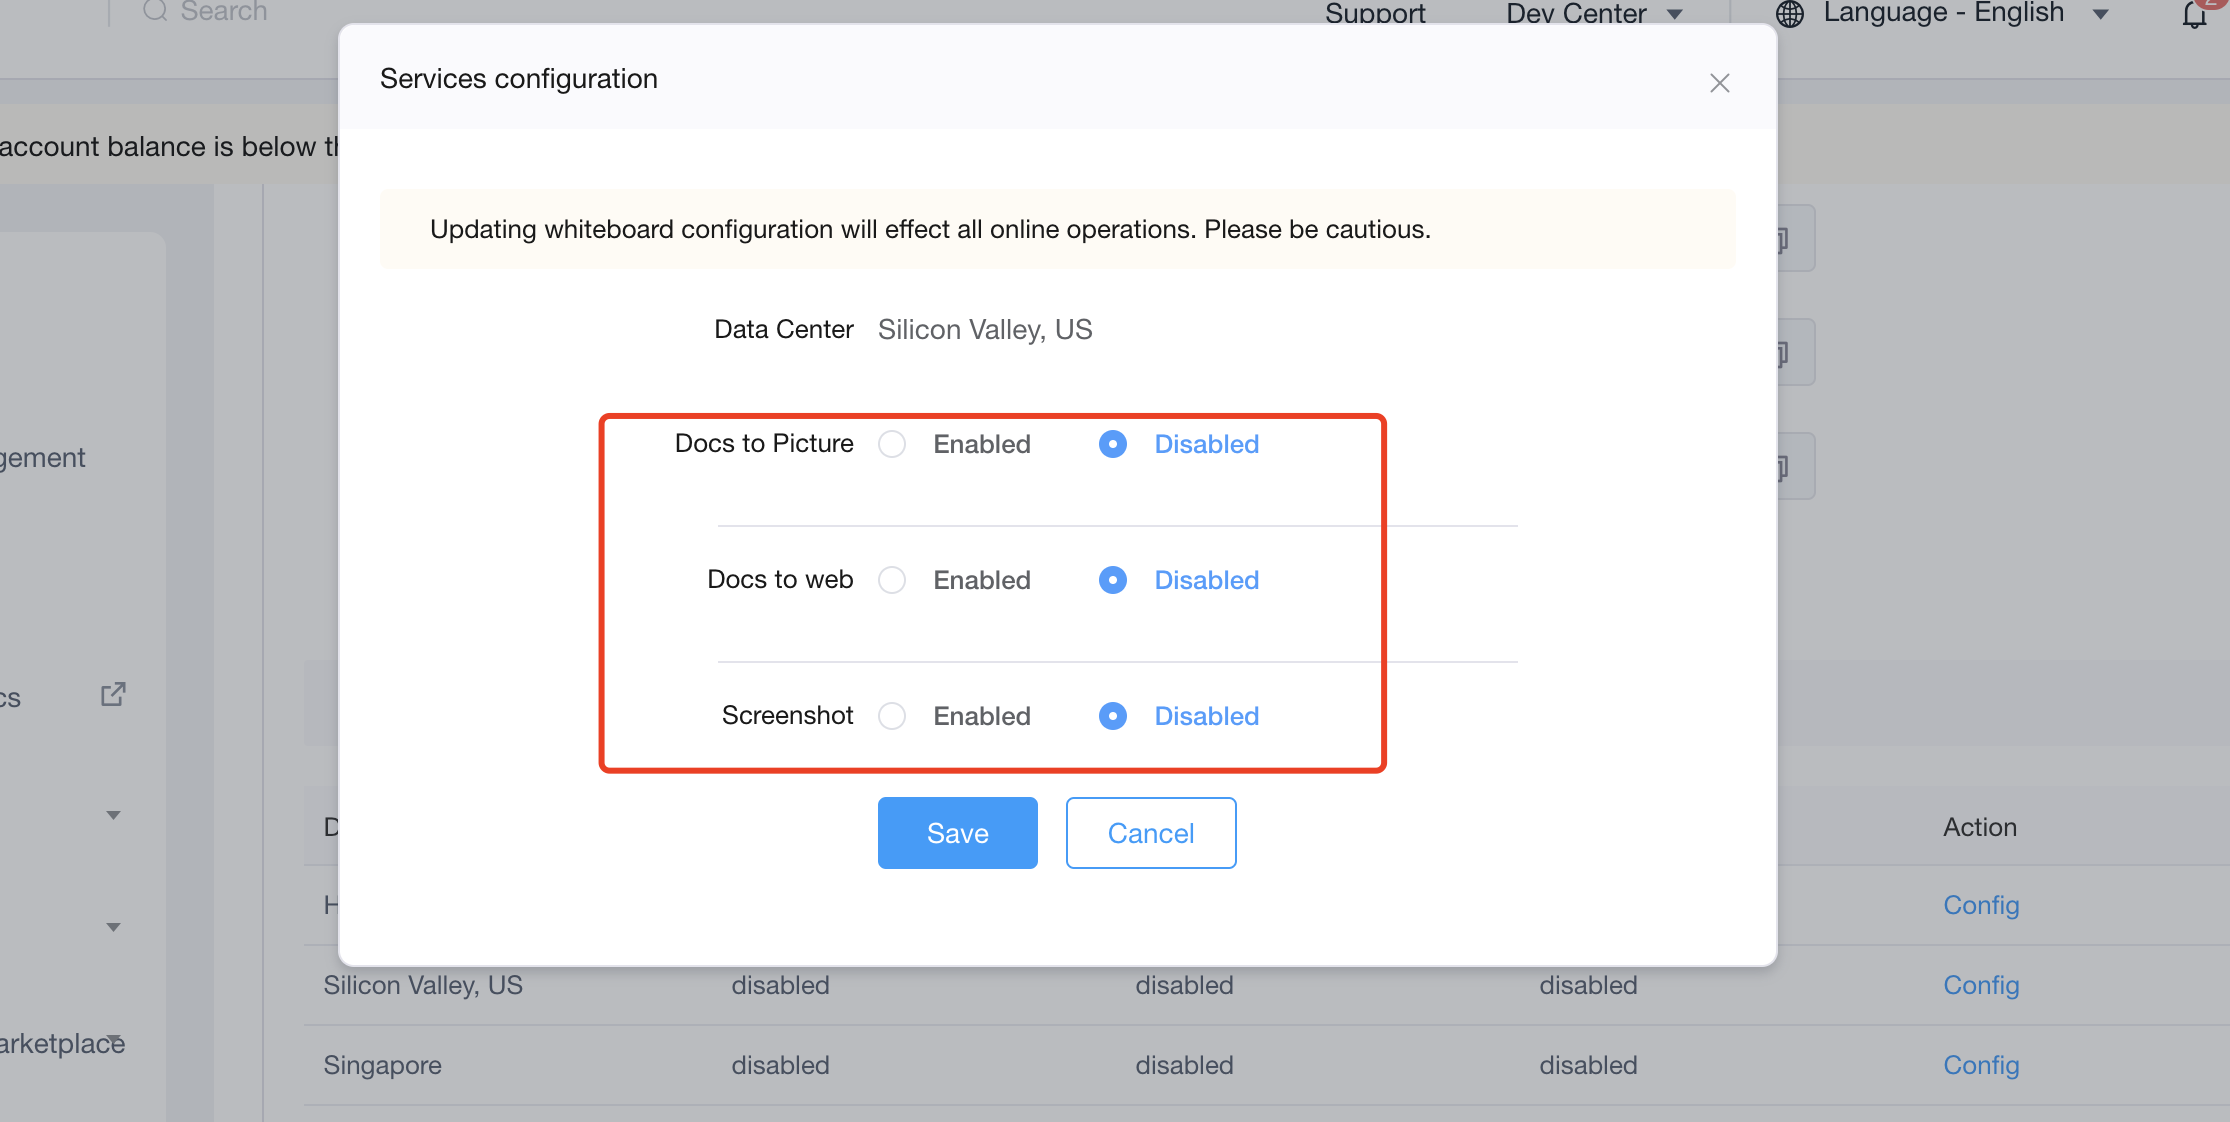
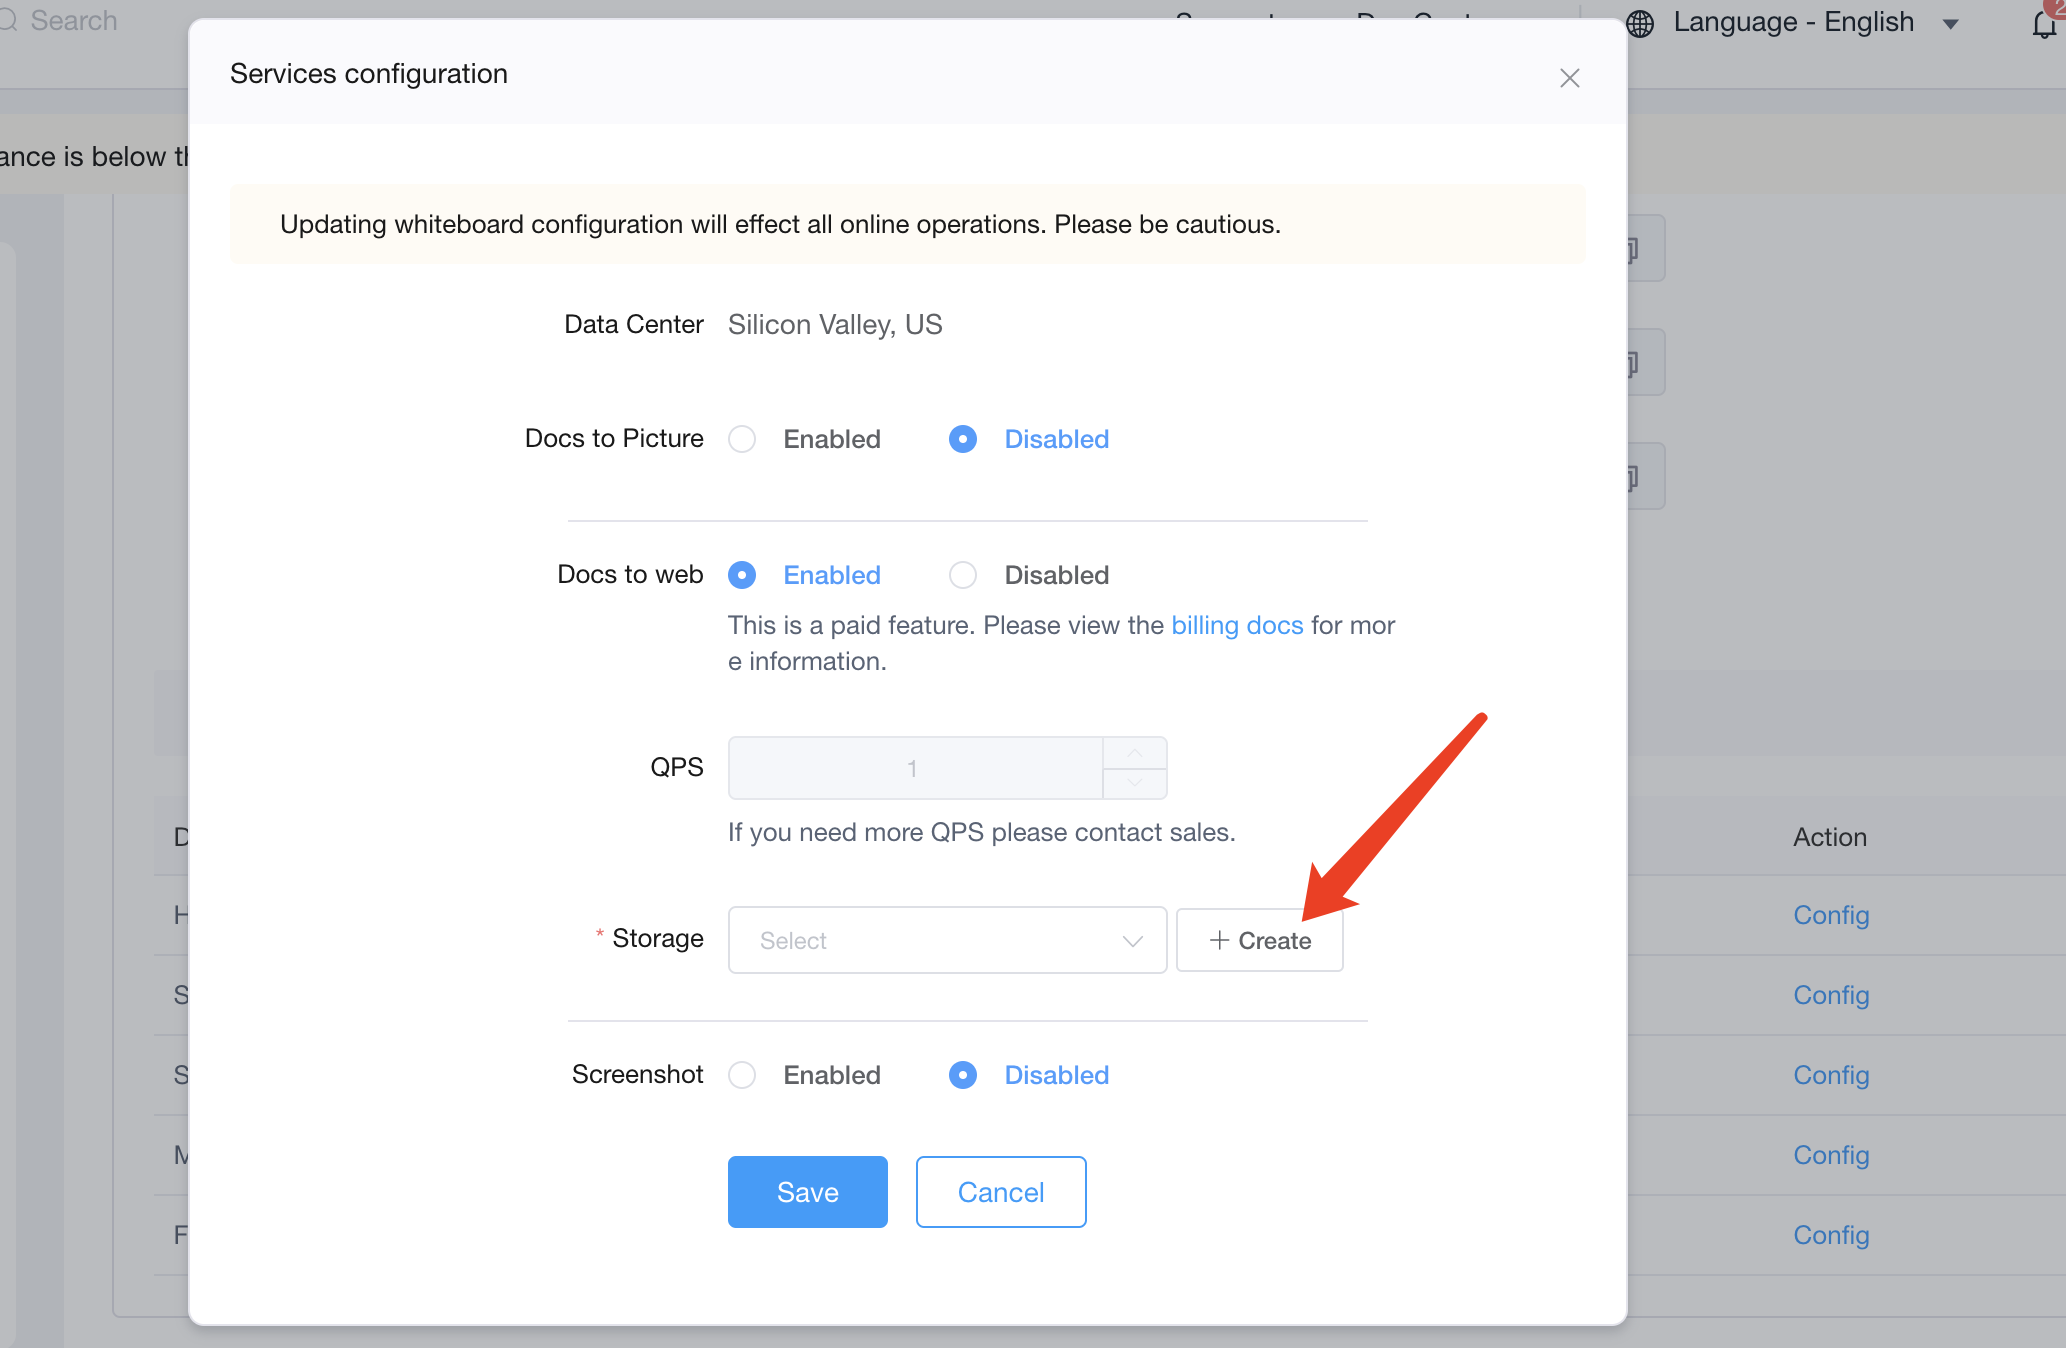
On the Services configuration page, select Enabled for Docs to Picture or Docs to web to see Storage settings.
-
Set up the storage space:
-
To select a previously configured storage space, click the arrowhead to the right of Storage and select a configuration from the drop-down list.
-
To add a new storage space, click + Create:
 Fill in the storage information as follows:
- Name: (Required) The name of your storage space.
- Vendor: (Required) The third-party cloud storage vendor. Choose from the following options:
AWSAlibaba CloudGoogle Cloud Platform
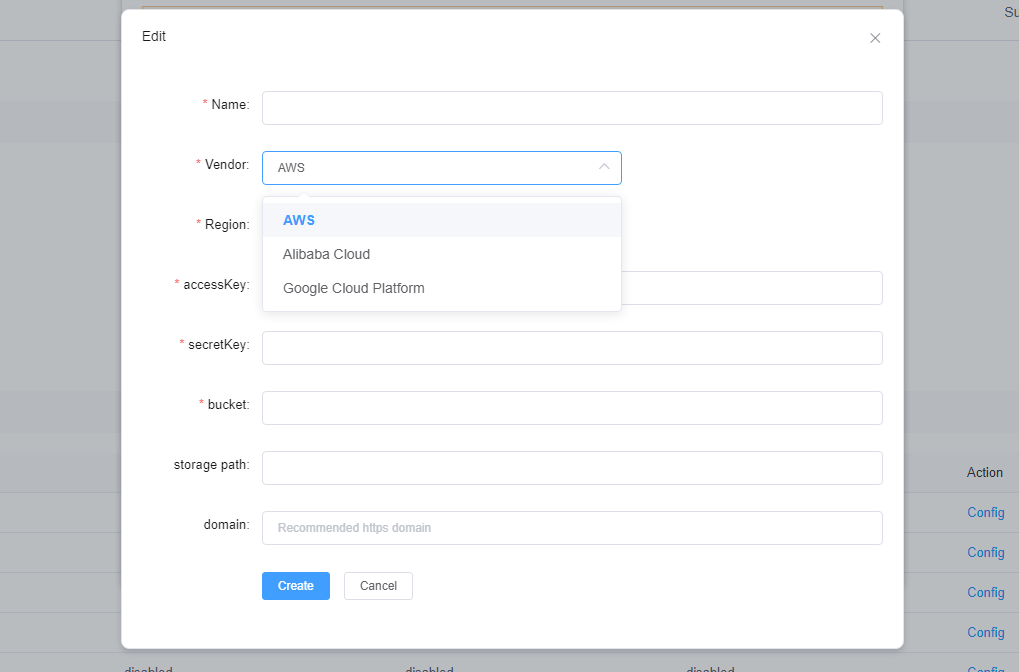
If you choose AWS, or Alibaba, fill in the following information:
- Region: (Required) The location of the data center you specified when creating a bucket.
- accessKey: (Required) The Access Key provided by the third-party cloud storage vendor, which is used by the vendor to identify visitors.
- secretKey: (Required) The Secret Key provided by the third-party cloud storage vendor, which is used to authenticate signatures.
- bucket: (Required) The name of the bucket.
- Storage path: The path used to save the resources in the storage space. The default is the root directory.
- Domain: The domain name used to access the third-party cloud storage service.
To configure storage parameters for GCP, see Google Cloud Storage configuration. To get configuration information for other third-party storage services, see the documentation provided by the vendor.
You should enable public access or higher permission for third-party storage spaces so that your app clients can access files saved in the space.
-
-
Click Create, read the pop-up prompt carefully, and click Confirm.
Start file conversion
Take the following steps:
-
To start a file-conversion task, call the RESTful API and pass in the URL address of the source file along with other parameters. See Start file conversion.
-
To query the progress of a file-conversion task, pass in the corresponding task UUID and Task Token. See Query file-conversion progress. Agora recommends that you implement an algorithm to regularly query the conversion progress so that your data is up to date.
Reference
This section contains information that completes the information on this page, or points you to documentation that explains other aspects of this product.
Google Cloud Storage configuration
To set up cloud storage and obtain configuration information for Google Cloud Platform, take the following steps:
-
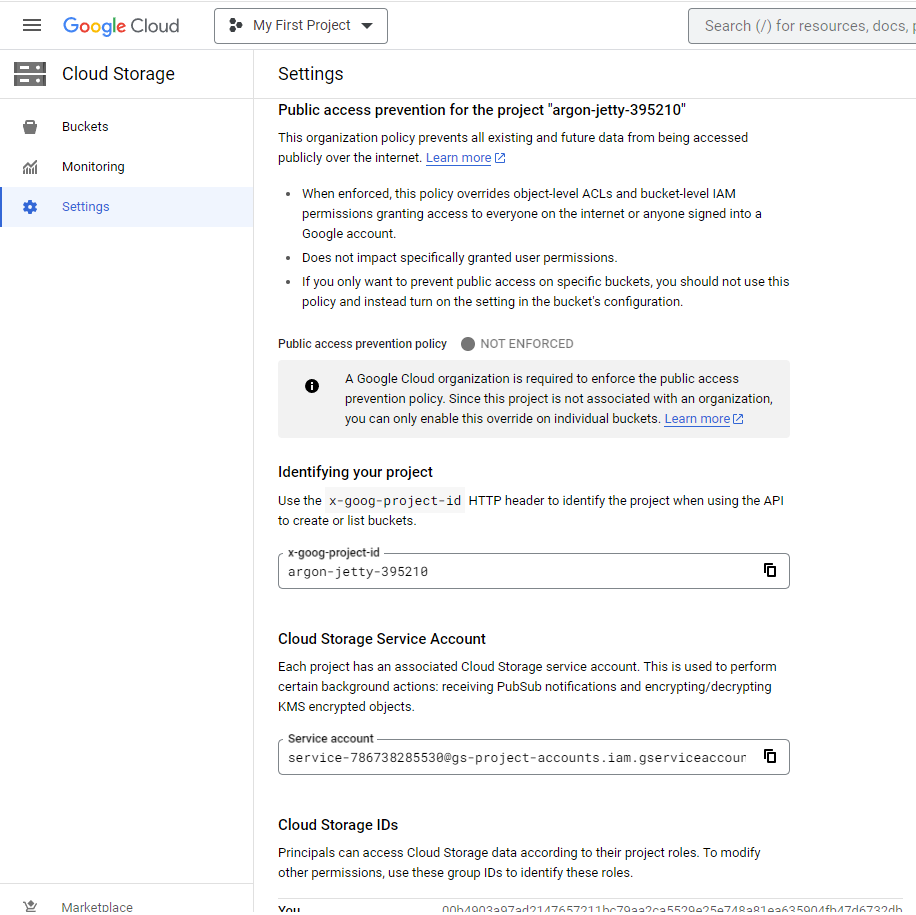
Create an account on Google Cloud and assign permissions on the settings page of Google Cloud storage.
-
After creation, click on the
 button in the upper right corner and select Project settings.
 -
Under IAM and Admin, select Service Accounts. In the service account list, click on the
button for the account just added, and select Manage keys. -
Click ADD KEY > Create new key. Select JSON in the pop-up box and click CREATE. A
jsonfile is downloaded with the name formatprojectId-xxxxxxxx.json.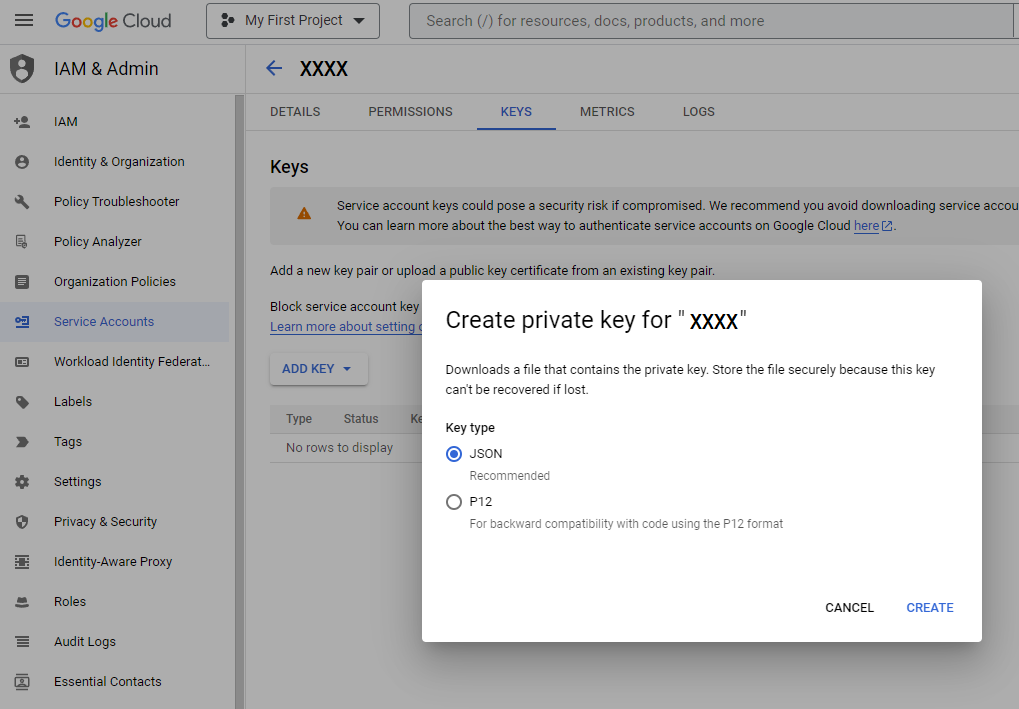
-
Open the downloaded json file, which looks like the following example:
-
Use the information in the json file to fill-in the Google Cloud Storage configuration:
The
project_idin the json file corresponds to theprojectIdon Agora Console,client_emailcorresponds toclientEmail,private_keycorresponds toprivateKey, andbucketis filled with the name of thebucketto be used. The remaining parameters have the same meaning as for the AWS configuration. When copying theprivate_key, make sure that your text editor has not added any extra line breaks or\nafter each\n.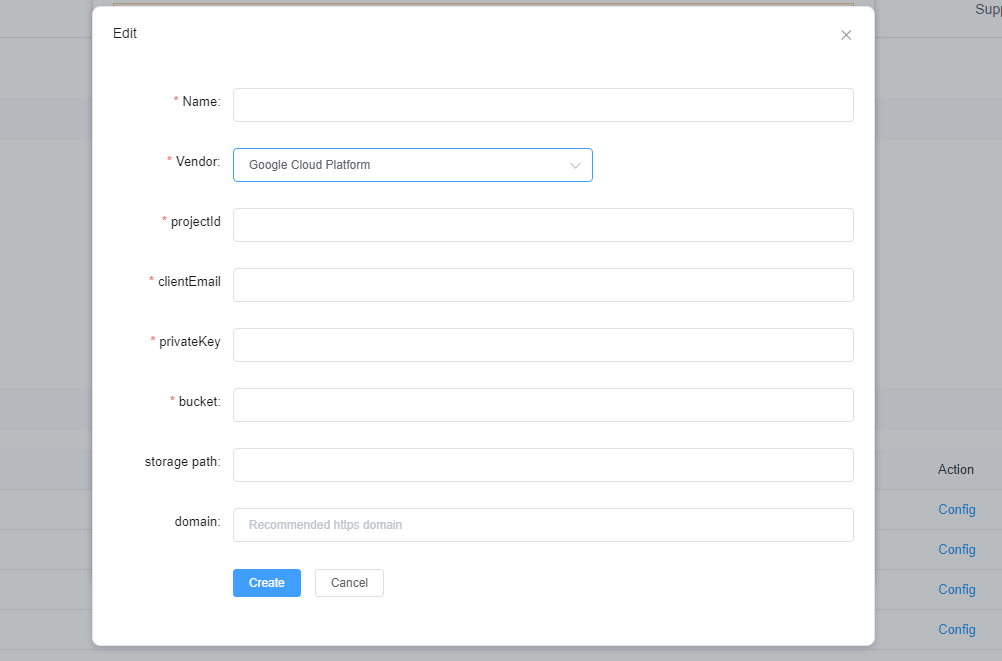
-
Ensure that the newly created service account has writable permission for the Google storage bucket.