Screen sharing
During Broadcast Streaming sessions, hosts use the screen sharing feature in the Agora Video SDK to share their screen content with other users or viewers in the form of a video stream. Screen sharing is typically used in the following scenarios:
| Scenario | Description |
|---|---|
| Online education | Teachers share their slides, software, or other teaching materials with students for classroom demonstrations. |
| Game live broadcast | Hosts share their game footage with the audience. |
| Interactive live broadcast | Anchors share their screens and interact with the audience. |
| Video conferencing | Meeting participants share the screen to show a presentation or documents. |
| Remote control | A controlled terminal displays its desktop on the master terminal. |
Agora screen sharing offers the following advantages:
- Ultra HD quality experience: Supports Ultra HD video (4K resolution, 60 FPS frame rate), giving users a smoother, high-definition, ultimate picture experience.
- Multi-app support: Compatible with many mainstream apps such as WPS Office, Microsoft Office Power Point, Visual Studio Code, Adobe Photoshop, Windows Media Player, and Scratch. This makes it convenient for users to directly share specific apps.
- Multi-device support: Supports multiple devices sharing at the same time. Screen sharing is compatible with Windows 8 systems, devices without independent graphics cards, dual graphics card devices, and external screen devices.
- Multi-platform adaptation: Supports iOS, Android, macOS, Windows, Web, Unity, Flutter, React Native, Unreal Engine, and other platforms.
- High security: Supports sharing only a single app or part of the screen. Also supports blocking specified app windows, effectively ensuring user information security.
This page shows you how to implement screen sharing in your app.
Understand the tech
The screen sharing feature provides the following screen sharing modes for use in various scenarios:
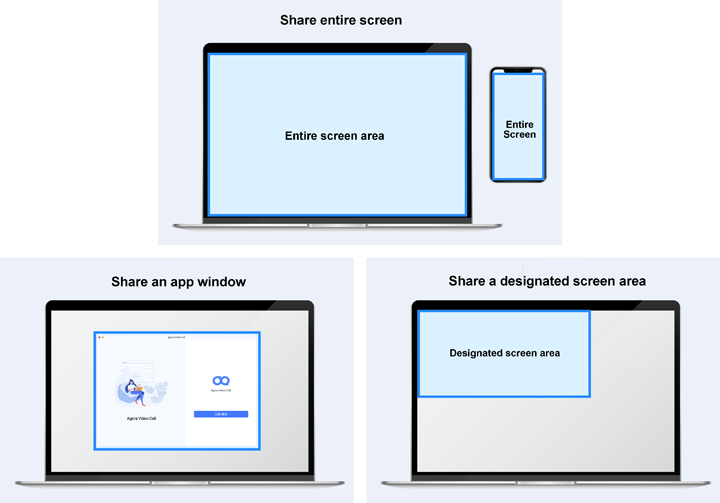
- Share the entire screen: Share your entire screen, including all the information on the screen. This feature supports collecting and sharing information from two screens at the same time.
- Share an app window: If you don't want to share the entire screen with other users, you can share only the area within an app window.
- Share a designated screen area: If you only want to share a portion of the screen or app window, you can set a sharing area when starting screen sharing.
Screen sharing modes are available on different platforms as follows:
- Desktop (Windows and macOS): Supports all screen sharing features listed above.
- Mobile (Android and iOS): Only supports sharing the entire screen.
Prerequisites
- On the Android platform, please ensure that the user has granted screen capture permission to the app.
- Ensure that you have implemented the SDK quickstart in your project.
Implement screen sharing
This section introduces how to implement screen sharing in your project. The basic API call sequence is shown in the figure below:

Choose one of the following methods to enable screen sharing according to your scenario:
-
Call
startScreenCapturebefore joining the channel, then calljoinChannel [2/2]to join the channel and setpublishScreenCaptureVideoto true to start screen sharing. -
Call
startScreenCaptureafter joining the channel, then callupdateChannelMediaOptionsto update the channel media options and setpublishScreenCaptureVideoto true to start screen sharing.
The flow diagram and implementation steps in this article demonstrate the first scenario.
Integrate screen sharing plug-in
Screen sharing in the Agora Video SDK is implemented through a plug-in. You can automatically integrate the plug-in through Maven Central or manual import of the aar file.
Automatic integration
When integrating the SDK through Maven Central, add dependencies by modifying the dependencies field in the /Gradle Scripts/build.gradle(Module: <projectname>.app) file as follows:
Manual integration
-
Copy the
AgoraScreenShareExtension.aarfile from the downloaded SDK to the/app/libs/directory. -
Add the following line to the
dependenciesnode of the/app/build.gradlefile to support importingaarfiles: -
Ensure that the file
libagora_screen_capture_extension.soexists in thejniLibsfolder of your project. If it does not, copy it manually from the downloaded SDK folder. -
Add the following code to the
/Gradle Scripts/build.gradle(Module: <projectname>.appfile to specify the location of the JNI library:
Set up the audio scenario
Call setAudioScenario and set the audio scenario to AUDIO_SCENARIO_GAME_STREAMING (high-quality scenario) to improve the success rate of capturing system audio during screen sharing. This step is optional.
Enable screen capture
Call startScreenCapture to start capturing the screen and set the following parameters according to your application scenario:
captureVideo: Whether to capture system video during screen sharing.captureAudio: Whether to capture system audio during screen sharing.captureSignalVolume: The volume of the captured system audio.width: Specifies the width in pixels of the video encoding resolution.height: Specifies the height in pixels of the video encoding resolution.frameRate: Video encoding frame rate (FPS).bitrate: Video encoding bitrate (Kbps).contentHint: Content type of screen sharing video.
Publish a screen sharing video stream in a channel
Call joinChannel [2/2] to join the channel. Set the options parameter to publish the captured screen sharing video stream as follows:
Set up a screen sharing scene (Optional)
Call the setScreenCaptureScenario method to set the screen sharing scenario and choose the screenScenario that best fits your application from the following:
SCREEN_SCENARIO_DOCUMENT(1): Document sceneSCREEN_SCENARIO_GAMING(2): Game sceneSCREEN_SCENARIO_VIDEO(3): Video scene
Update screen sharing
If you want to update the screen sharing parameters, such as the video encoding resolution, frame rate, or bitrate, call updateScreenCaptureParameters to modify the parameter values. This step is optional.
Stop screen sharing
Call stopScreenCapture to stop screen sharing within the channel.
Limitations
Be aware of the following limitations:
-
After turning on screen sharing, Agora uses the resolution of the screen sharing video stream as the billing standard. Please see Pricing for details. The default resolution is 1280 × 720, but you can adjust it according to your business needs.
-
Due to Android performance limitations, screen sharing does not support Android TV.
-
When using screen sharing on Huawei mobile phones, do not adjust the video encoding resolution of the screen sharing stream during the sharing process to avoid crashes.
-
Some Xiaomi phones do not support capturing system audio during screen sharing.
-
On Android 9 and later, to avoid system termination when the app is backed up, it is recommended to add the foreground service permission:
android.permission.FOREGROUND_SERVICEto the/app/Manifests/AndroidManifest.xmlfile. -
Screen capture is only available for Android API level 21 (Android 5) or later. On earlier versions the SDK reports error codes
ERR_SCREEN_CAPTURE_PERMISSION_DENIED(16)andERR_ SCREEN_CAPTURE_SYSTEM_NOT_SUPPORTED(2). -
Capturing system audio is only available for Android API level 29 (Android 10) or later. On earlier versions, the SDK reports the error code
ERR_SCREEN_CAPTURE_SYSTEM_AUDIO_NOT_SUPPORTED(3).
Reference
This section contains content that completes the information on this page, or points you to documentation that explains other aspects to this product.
Sample project
Agora provides an open-source Android sample project on GitHub. Download and explore this project for a more detailed example.