Enable and configure Chat
Before using Chat, you need to enable and configure it through Agora Console.
Prerequisites
To enable Chat, make sure that you have the following:
- A valid Agora account.
- An Agora project that uses App ID and Token for authentication.
- A Chat pricing plan. For details on how to subscribe, see Subscribe to the pricing plan.
Enable Chat
-
Log in to the Agora Console.
-
In the left navigation bar, click Project Management and click Config for the project that you want to use.
-
In the Features section of the Edit Project page, click Enable next to Chat to enable Chat.
If this is your first Chat project, select and subscribe to a Chat package:
-
Select a data center closest to where most of your end users are located.
Once Chat is enabled, you are redirected to the Chat config page.
-
Enable the advanced Chat features based on your business requirements.
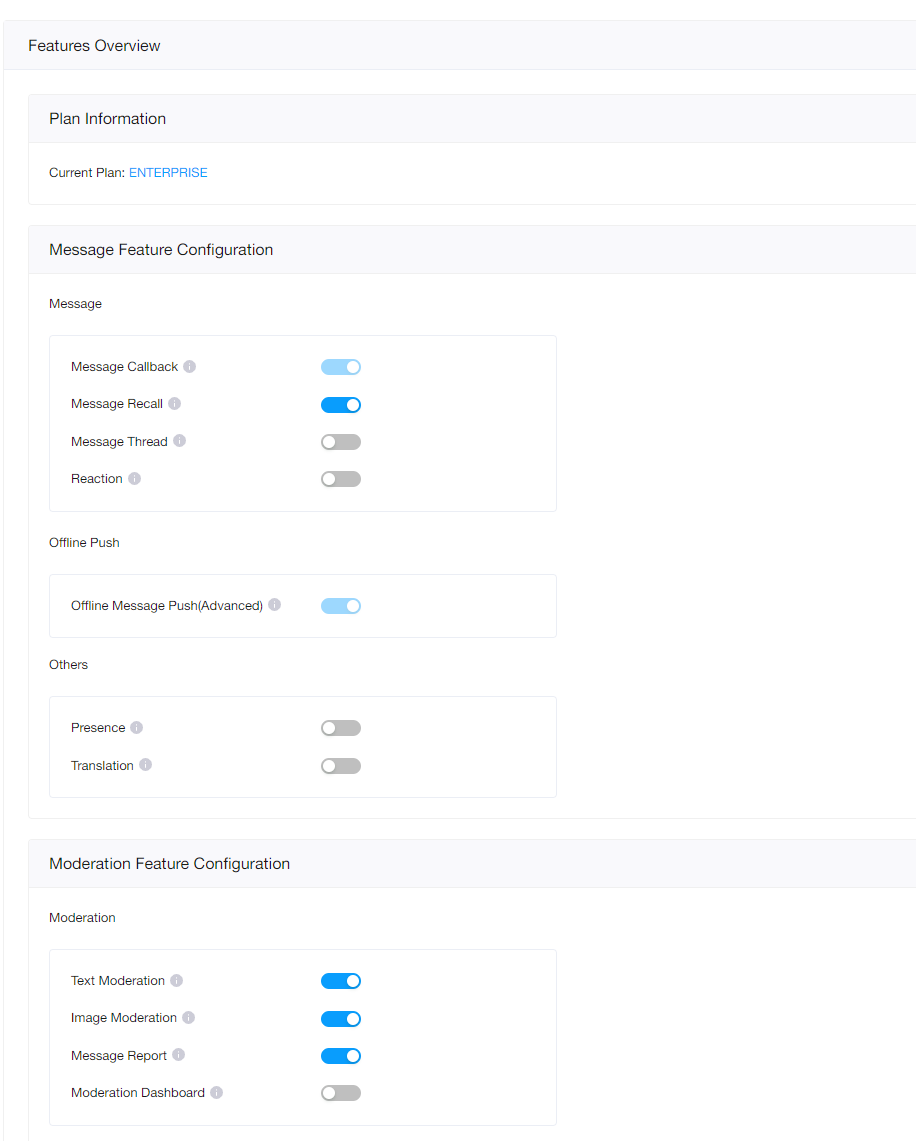
For details about these advanced features, see the following:
- Message Callback
- Message Recall
- Message Thread
- Reaction
- Offline Message Push (Advanced)
- Presence
- Translation
- Moderation
Get Chat project information
Agora Console assigns the following information to each project that enables Chat:
- Data Center: Agora provides several data centers for the service in different regions, including Singapore, Frankfurt (Germany), and Virginia (USA). After the plan is changed, the data center remains unchanged.
- AppKey: The unique identifier that Chat assigns to each app. The AppKey is of the form
${OrgName}#{AppName}. - OrgName: The unique identifier that Chat assigns to each enterprise (organization).
- AppName: The name that Chat assigns to each app. Each app under the same enterprise (organization) must have a unique App Name.
- API request url: The domain of the WebSocket and RESTful API request that Agora assigns to each project.
Follow these steps to get the project information:
- Find your Chat-enabled project on the Project Management page on Agora Console and click Config.
- On the project edit page, find Chat and click Config.
- On the Chat config page, get the values of Data Center, AppKey, OrgName, AppName, WebSocket Address, and REST API.
Manage users and generate tokens
For development purposes, Agora enables you to manage users and generate Chat user authentication tokens using Agora Console. In a production environment, you use the RESTful API to manage users and a token server to generate user authentication tokens.
This section shows you how to register Chat users and generate temporary tokens using Agora Console.
Register a user
To register a user, do the following:
-
On the Project Management page, click Config for the project that you want to use.
-
On the Edit Project page, click Config next to Chat below Features.
-
In the left-navigation pane, select Operation Management > User and click Create User.
-
In the Create User dialog box, fill in the User ID, Nickname, and Password, and click Save to create a user.
Generate an app token
In the Data Center section of the Application Information page, click Generate next to Chat App Temp Token to generate a token with app privileges.

Generate a user token
To ensure communication security, Agora recommends using tokens to authenticate users who log in to Chat.
For testing purposes, Agora Console supports generating temporary tokens for Chat. To generate a user token, do the following:
-
On the Project Management page, click Config for the project that you want to use.
-
On the Edit Project page, click Config next to Chat below Features.
-
In the Data Center section of the Application Information page, enter the user ID in the Chat User Temp Token box and click Generate to generate a token with user privileges.
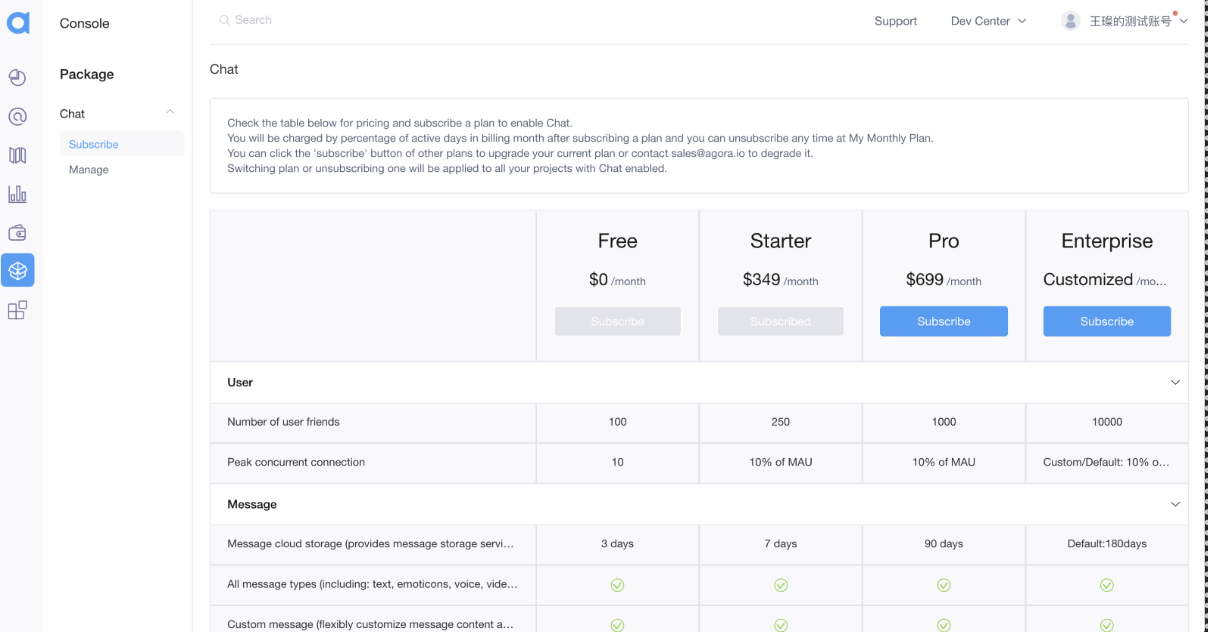
Change the Chat plan
-
Log in to the Agora Console.
-
In the left navigation bar, click Package.
-
On the Subscribe tab, you can change your Chat plan by clicking Subscribe next to the desired plan.
Note:
- The plan change takes effect immediately.
- Agora doesn't recommend plan downgrading, as it could impact the capacity of your applications and availability of certain features.
Disable Chat
-
Log in to the Agora Console.
-
In the left navigation bar, click Project Management and click Config for the project that you want to use.
-
In the Features section of the Edit Project page, click Enable/Configure next to Chat.
-
On the Application Information page, disable Chat in the Chat Service Status section.
Note: When you disable Chat, the Chat-related data is still stored in the Chat data center, and you are still charged for the plan activation fee.
Unsubscribe Chat
Before unsubscribing Chat, disable all projects that have Chat enabled.
-
Log in to the Agora Console.
-
In the left navigation bar, click Package.
-
On the Subscribe tab, scroll down to the bottom and click Unsubscribe.
Note:
When you unsubscribe Chat:
- All Chat-related data is purged.
- You are still billed with a pro-rated monthly fee and the usage that occurred during that month.
Next steps
After enabling and configuring Chat, the Chat-related features in Agora Analytics are enabled by default to help you keep track of usage trends and quality details. For more information, see Data Insights and Data Metrics.