Android
iOS
Web
Windows
Unity
Flutter
React Native

Offline push

Chat supports the integration of Google Firebase Cloud Messaging (FCM). This enables Android developers to use an offline push notification service. The service features low latency, high delivery, high concurrency, and no violation of the users' personal data.

Understand the tech

The following figure shows the basic workflow of Chat:

1655713515869

Assume that User A sends a message to User B, but User B goes offline before receiving it. The Chat server pushes a notification to the device of User B via FCM and temporarily stores this message. Once User B comes back online, the Chat SDK pulls the message from the server and pushes the message to User B using persistent connections.

Prerequisites

Before proceeding, ensure that you meet the following requirements:

  • You have initialized the Chat SDK. For details, see SDK quickstart.
  • You understand the call frequency limit of the Chat APIs supported by different pricing plans as described in Limitations.

Integrate FCM with Chat

This section guides you through how to integrate FCM with Chat.

Note
For devices using the Android system, if FCM and push services from other manufacturers are enabled at the same time, FCM push services will be used first.

1. Create a project in Firebase

  1. Log in to the Firebase console and add a project.

  2. Register the application in the project.

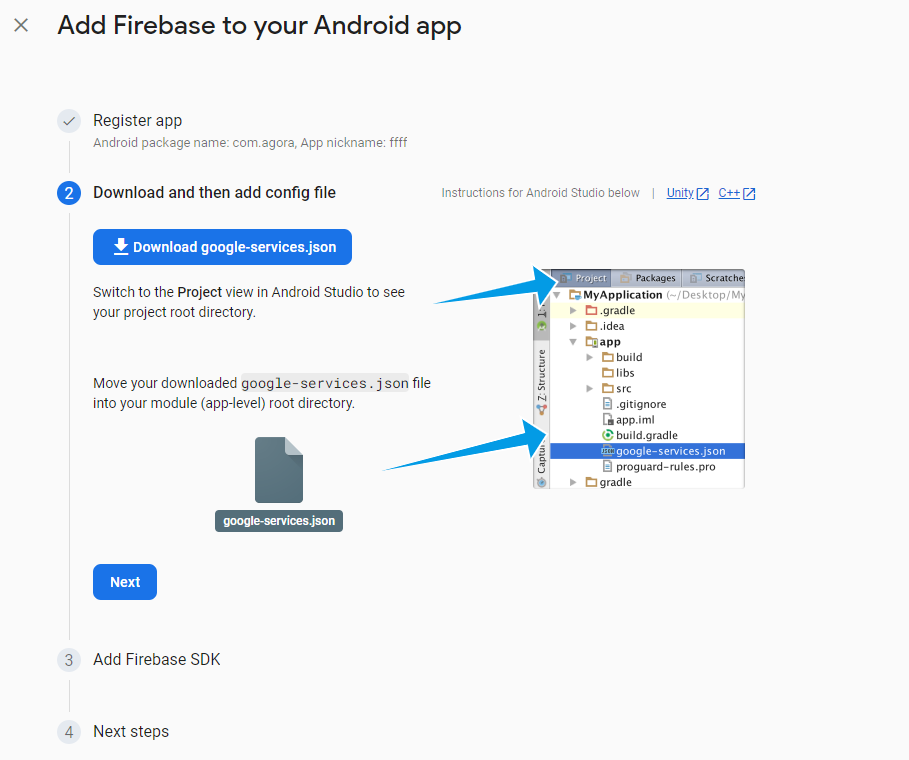
    In the Download and then add config file step of the Add Firebase to your Android app page, click Download google-services.json and put the file into your Android app module root directory.

    push_fcm_download_googleservice

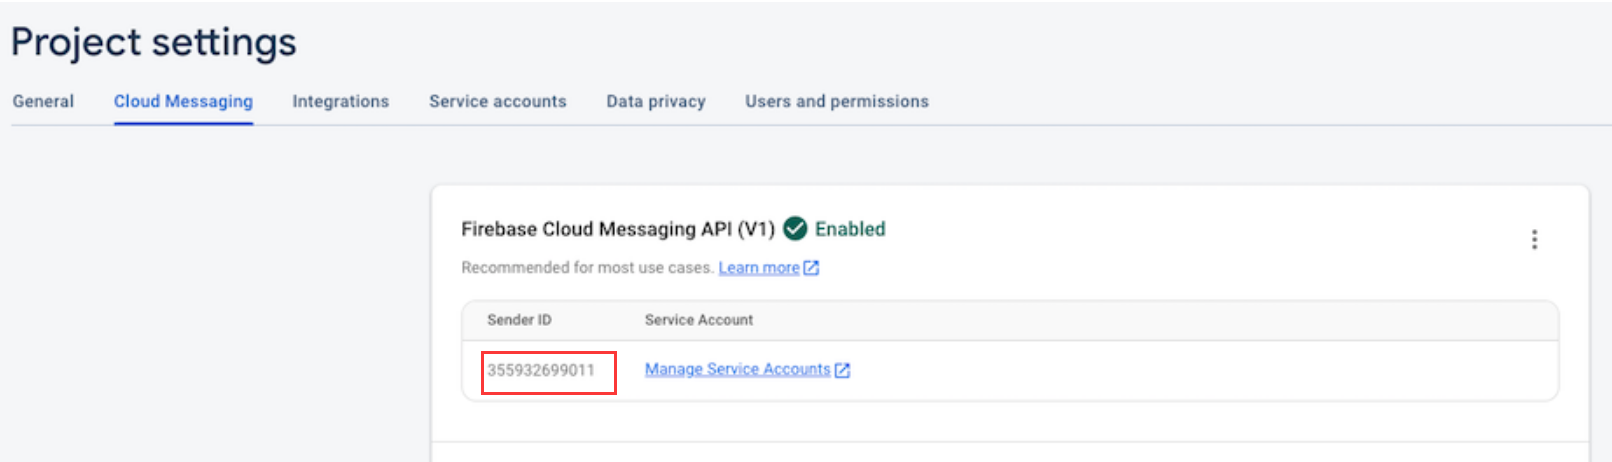
  3. Query the sender ID. On the Project settings page, select the Cloud Messaging tab and view Sender ID. When uploading the FCM certificate to Agora Console, set the certificate name to the FCM sender ID.

    push_fcm_senderid.png

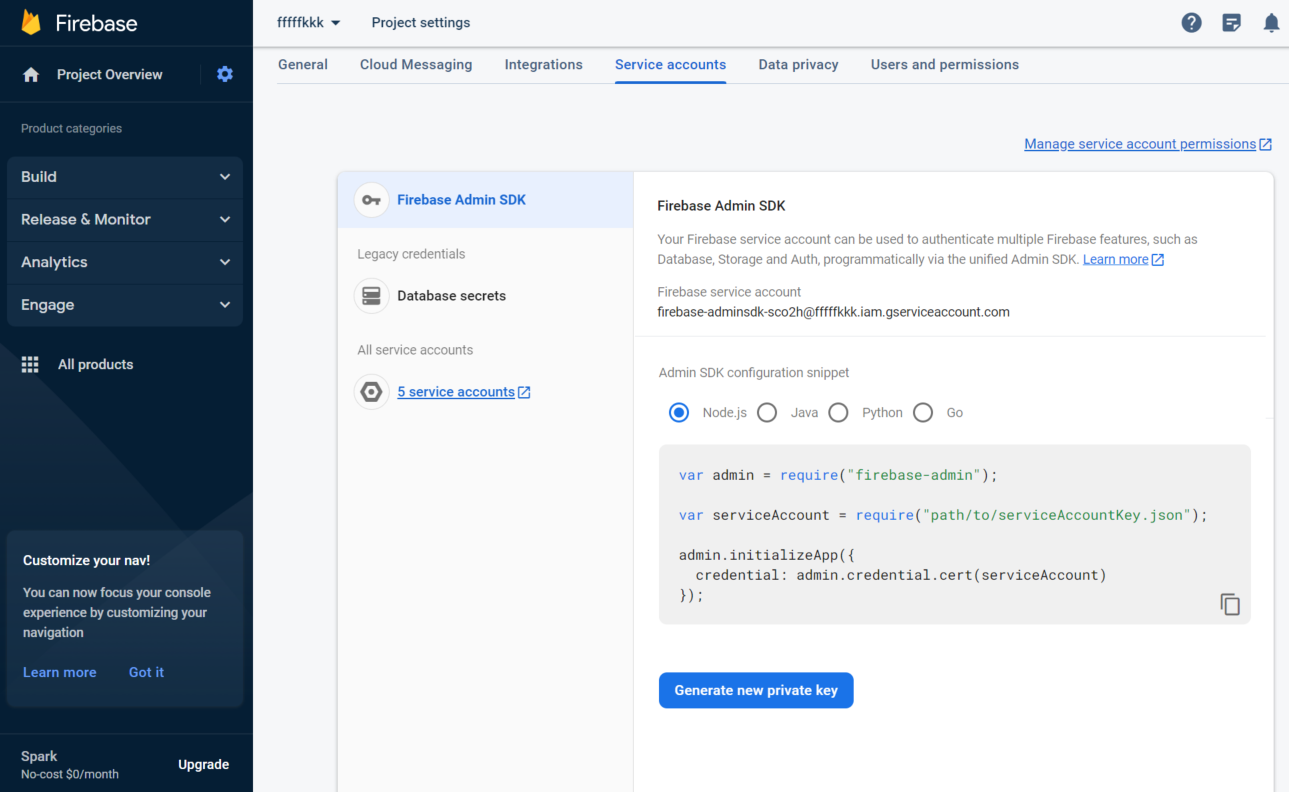
  4. On the Project settings page, select the Service accounts tab and click Generate new private key to generate a JSON file. Save this file and upload it to Agora Console when using the V1 certificate.

    push_fcm_private_key

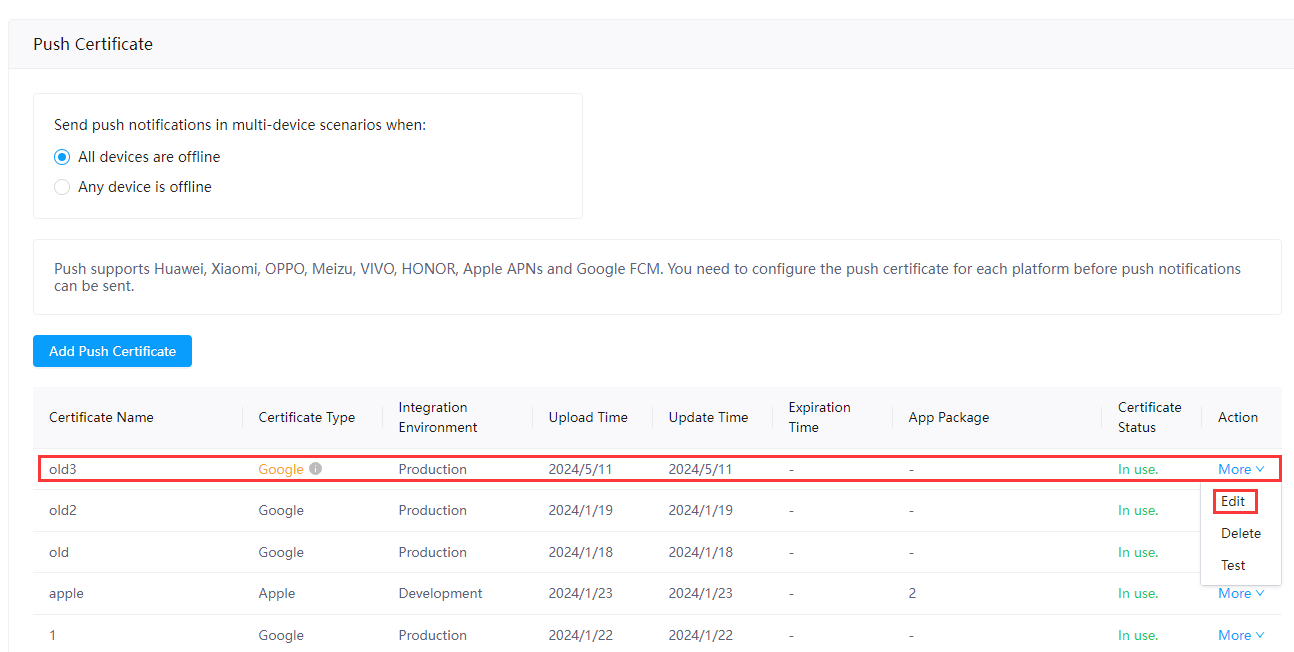
2. Upload FCM certificate to Agora Console

After successfully logging into Chat, you can upload the FCM push certificate to Agora Console:

  1. Log in to Agora Console, and click Project Management in the left navigation bar.

  2. On the Project Management page, locate the project that has Chat enabled and click Config.

  3. On the project edit page, click Config next to Chat.

  4. On the project config page, select Features > Push Certificate and click Add Push Certificate.

  5. In the pop-up window, select the Google tab, and configure the following fields:
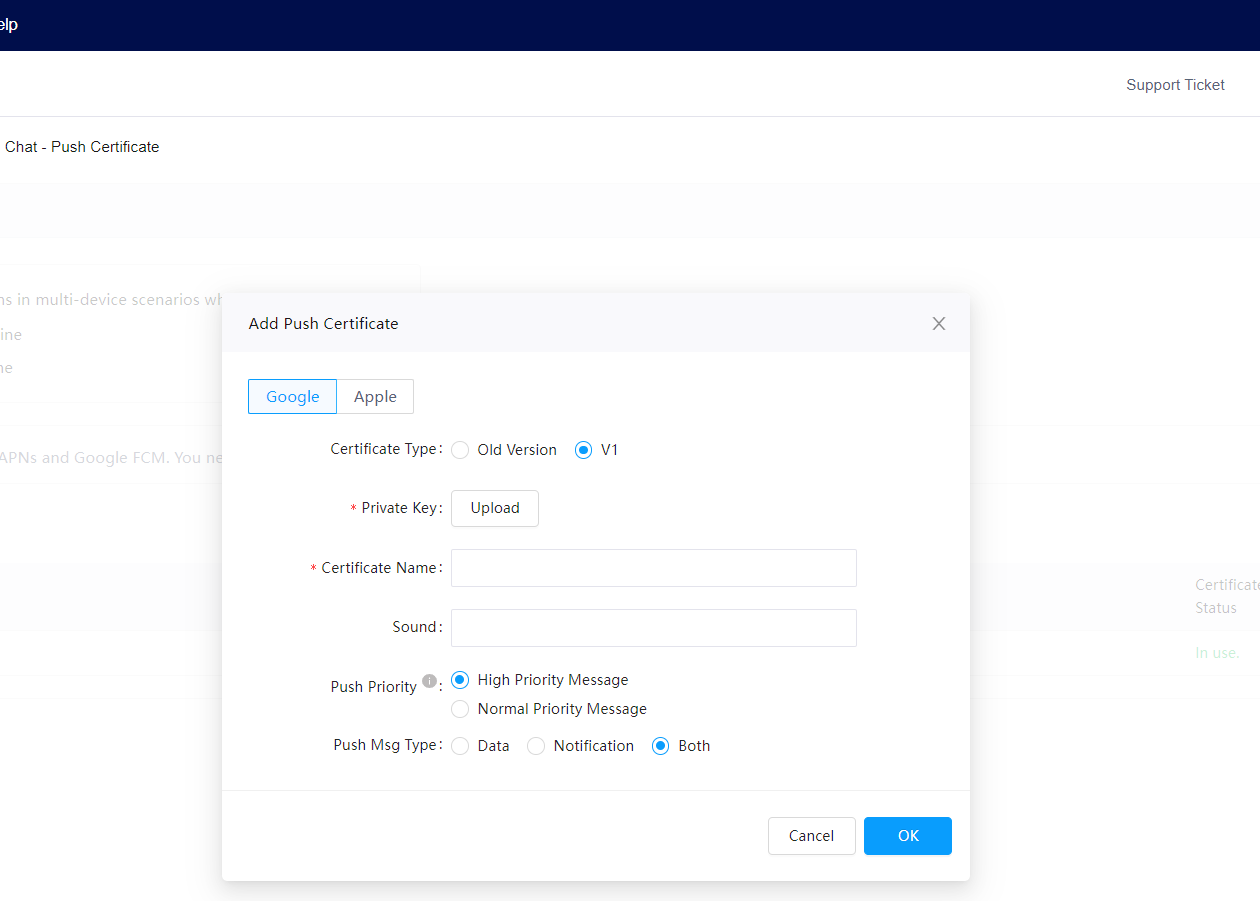
    push_fcm_add_certificate

    ParameterTypeRequiredDescription
    Certificate TypeNoSelect whether to use a V1 certificate or a legacy certificate.
    • V1: Recommended. You need to configure a Private Key.
    • Legacy: Will soon be deprecated. You need to configure a Push Key.
    Private KeyfileYesClick Generate new private key on the Project settings > Service accounts page of the Firebase Console to generate the .json file, then upload it to Agora Console.
    Push KeyStringYesFCM Server Key. Obtain the server key in the Cloud Messaging API (Legacy) area of the Project settings > Cloud Messaging page of the Firebase Console.

    This parameter is only valid for legacy certificates.
    Certificate NameStringYesThe sender ID configured for the FCM.
    • For the new version of the certificate, you can find the sender ID on the Project settings > Cloud Messaging page of the Firebase Console.
    • For legacy certificates, go to the *Project settings > Cloud Messaging page of the Firebase Console, and get the sender ID in the Cloud Messaging API (Legacy) area.

    The certificate name is the only condition used by the Agora server to determine which push channel the target device uses, so ensure that the sender set when integrating FCM in Chat is consistent with what is set here.
    SoundStringNoThe ringtone flag for when the receiver gets the push notification.
    Push PriorityNoMessage delivery priority. See Setting the priority of a message.
    Push Msg TypeNoThe type of the message sent to the client through FCM. See Message types:
    • Data: Data message, processed by the client application.
    • Notification: Notification message, automatically processed by FCM SDK.
    • Both: Notification messages and data messages can be sent through the FCM client.

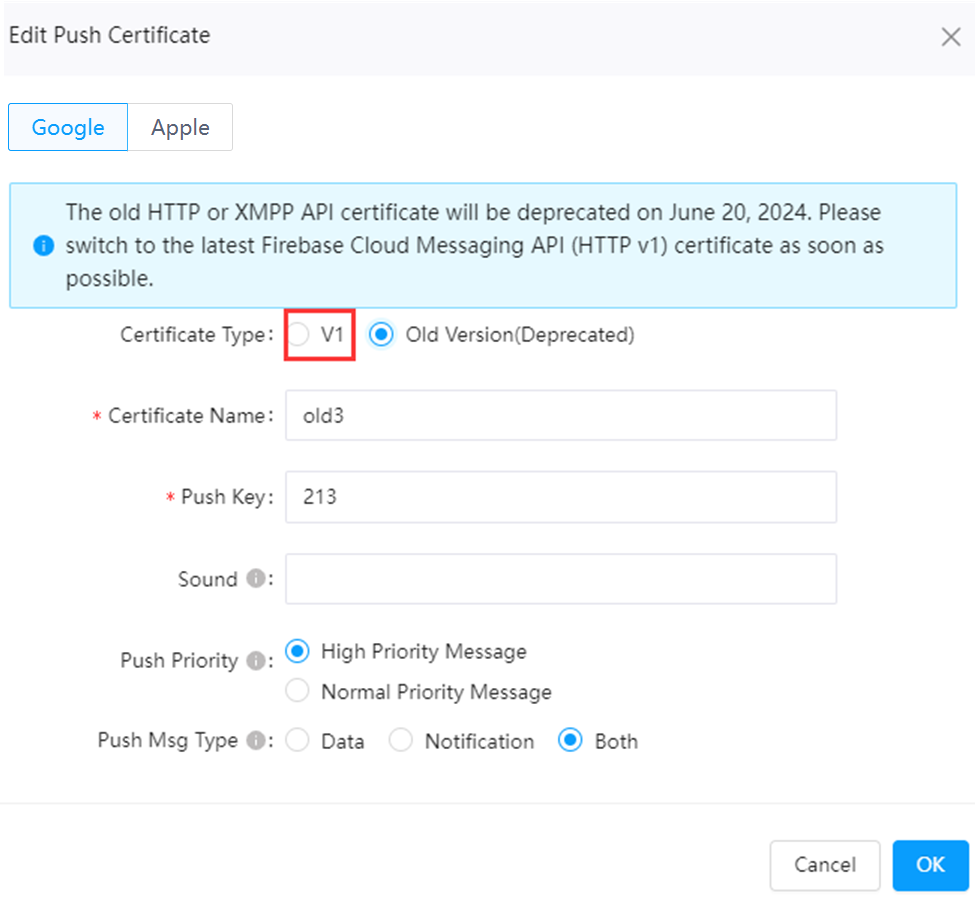
Switch from legacy to the V1 certificate

The legacy HTTP or XMPP API is being retired on June 20, 2024. In view of this, switch to the latest FCM API (HTTP v1) version of the certificate as soon as possible. See Firebase Console for details.

Make sure that the uploaded V1 certificate is available, as the legacy one will be deleted upon upload. If the new certificate is not available, the push will fail.

Take the following steps to switch from the old to the new certificate:

  1. Click Edit in the Action column of the old certificate on the Push Certificate page.

    push_fcm_oldcertificate_edit

  2. In the Google tab of the Edit Push Certificate window, switch the Certificate Type to V1.

    push_fcm_oldcertificate_switch

  3. Click Upload to upload the locally saved V1 certificate file (.json).

    push_fcm_newcertificate_upload

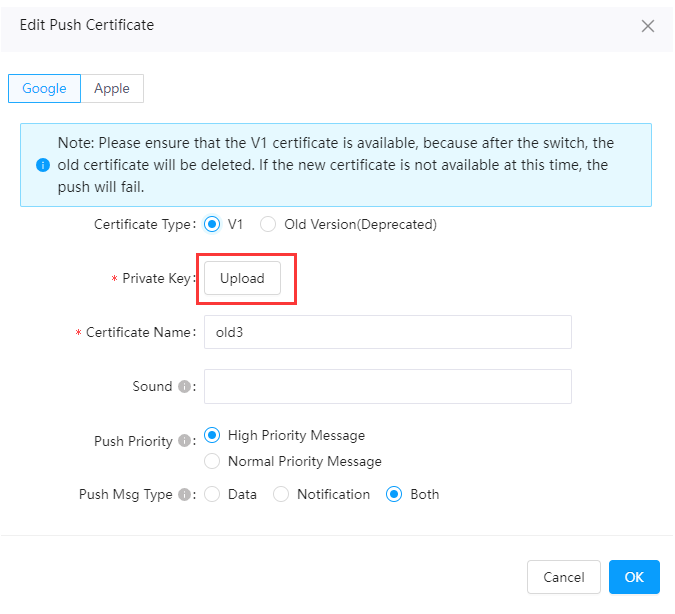
  4. Click OK to complete the switch.

3. Enable FCM in Chat

  1. In the build.gradle file of your project, configure dependencies on the FCM library.

_8
dependencies {
_8
// ...
_8
// Imports the Firebase BoM.
_8
implementation platform('com.google.firebase:firebase-bom:28.4.1')
_8
// Declares the dependencies for the Firebase Cloud Messaging.
_8
// When using the BoM, do not specify versions in Firebase library dependencies.
_8
implementation 'com.google.firebase:firebase-messaging'
_8
}

For Gradle 5.0 and later, BoM is automatically enabled, whereas for earlier versions of Gradle, you need to enable the BoM feature. See Firebase Android BoM and Firebase Android SDK Release Notes for details.
  1. Sync the project with the gradle files, extend FirebaseMessagingService, and register FirebaseMessagingService in the AndroidManifest.xml file of your project.

_19
public class EMFCMMSGService extends FirebaseMessagingService {
_19
private static final String TAG = "EMFCMMSGService";
_19
_19
@Override
_19
public void onMessageReceived(RemoteMessage remoteMessage) {
_19
super.onMessageReceived(remoteMessage);
_19
if (remoteMessage.getData().size() > 0) {
_19
String message = remoteMessage.getData().get("alert");
_19
Log.d(TAG, "onMessageReceived: " + message);
_19
}
_19
}
_19
_19
@Override
_19
public void onNewToken(@NonNull String token) {
_19
super.onNewToken(token);
_19
Log.d(TAG, "onNewToken: " + token);
_19
ChatClient.getInstance().sendFCMTokenToServer(token);
_19
}
_19
}


_7
<service
_7
android:name=".java.MyFirebaseMessagingService"
_7
android:exported="false">
_7
<intent-filter>
_7
<action android:name="com.google.firebase.MESSAGING_EVENT" />
_7
</intent-filter>
_7
</service>

  1. Initialize and enable FCM in the Chat SDK.

_25
ChatOptions options = new ChatOptions();
_25
...
_25
PushConfig.Builder builder = new PushConfig.Builder(this);
_25
// Replaces with your FCM Sender ID.
_25
builder.enableFCM("Your FCM sender id");
_25
// Sets push configurations in the ChatOptions class.
_25
options.setPushConfig(builder.build());
_25
// Initializes the Chat SDK.
_25
ChatClient.getInstance().init(this, options);
_25
// Sets the push listener.
_25
PushHelper.getInstance().setPushListener(new PushListener() {
_25
@Override
_25
public void onError(PushType pushType, long errorCode) {
_25
EMLog.e("PushClient", "Push client occur a error: " + pushType + " - " + errorCode);
_25
}
_25
@Override
_25
public boolean isSupportPush(PushType pushType, PushConfig pushConfig) {
_25
// Sets whether FCM is enabled.
_25
if(pushType == PushType.FCM) {
_25
return GoogleApiAvailabilityLight.getInstance().isGooglePlayServicesAvailable(MainActivity.this)
_25
== ConnectionResult.SUCCESS;
_25
}
_25
return super.isSupportPush(pushType, pushConfig);
_25
}
_25
});

  1. Pass the device token of FCM to the Chat SDK.

_17
// Checks whether FCM is enabled.
_17
if(GoogleApiAvailabilityLight.getInstance().isGooglePlayServicesAvailable(MainActivity.this) == ConnectionResult.SUCCESS) {
_17
return;
_17
}
_17
FirebaseMessaging.getInstance().getToken().addOnCompleteListener(new OnCompleteListener<String>() {
_17
@Override
_17
public void onComplete(@NonNull Task<String> task) {
_17
if (!task.isSuccessful()) {
_17
EMLog.d("PushClient", "Fetching FCM registration token failed:"+task.getException());
_17
return;
_17
}
_17
// Gets a new FCM registration token.
_17
String token = task.getResult();
_17
EMLog.d("FCM", token);
_17
ChatClient.getInstance().sendFCMTokenToServer(token);
_17
}
_17
});

  1. Listen for device token generation.

Rewrite the onNewToken callback of FirebaseMessagingService. Once a device token is generated, this callback passes the new device token to the Chat SDK at the earliest opportunity.


_8
@Override
_8
public void onNewToken(@NonNull String token) {
_8
Log.i("MessagingService", "onNewToken: " + token);
_8
// If you want to send messages to this application instance or manage the subscriptions of this app on the server side, send the FCM registration token to your app server.
_8
if(ChatClient.getInstance().isSdkInited()) {
_8
ChatClient.getInstance().sendFCMTokenToServer(token);
_8
}
_8
}

Set up push notifications

To optimize user experience when dealing with an influx of push notifications, Agora Chat provides fine-grained options for the push notification and do-not-disturb (DND) modes at both the app and conversation levels.

Push notification mode

Push Notification Mode Description Application Scope
All Receives push notifications for all offline messages. Application and one-to-one and group chat conversations
MENTION_ONLY Only receives push notifications for mentioned messages. This mode is recommended for group chats. To mention one or more members in a group, you need to pass em_at_list":["user1", "user2" ...] for the ext field; to mention all members in a group, pass "em_at_list":"all" for the ext field.
NONE Do not receive push notifications for offline messages.

The setting of the push notification mode at the conversation level takes precedence over that at the app level, and those conversations that do not have specific settings for the push notification mode inherit the app setting by default.

For example, assume that the push notification mode of the app is set to MENTION_ONLY, while that of the specified conversation is set to ALL. You receive all the push notifications from this conversation, while you only receive the push notifications for mentioned messages from all the other conversations.

Do-not-disturb mode

You can specify both the DND duration and DND interval at the app level. During the specified DND time periods, you do not receive any push notifications.

Do-not-disturb Parameter Type Description Application Scope
SILENT_MODE_INTERVAL Number

The interval during which the DND mode is scheduled everyday. The time is represented in the 24-hour notation in the form of H:M, for example, 8:30-10:00, where H ranges from 0 to 23 in hour and M from 0 to 59 in minute.

  • The DND mode is enabled everyday in the specified interval. For example, if you set the start time to 8:0 and end time to 10:0, the app stays in DND mode during 8:00-10:00; if you set the same period at 9:00, the DND mode works during 9:00-10:00 on the current day and 8:00-10:00 in subsequent days.
  • If the start time is set to the same time spot as the end time, the app enters the permanent DND mode. However, the value 0:0-0:0 means to disable the DND mode.
  • If the start time is later than the end time, the app remains in DND mode from the start time on the current day until the end time next day. For example, if you set the interval as 10:0-8:0, the DND mode lasts from 10:0 until 08:00 the next day.
  • Currently, only one DND interval is allowed, with the new setting overwriting the old.
  • If this parameter is not specified, pass in an empty string.
  • If both SILENT_MODE_INTERVAL and SILENT_MODE_DURATION are set, the DND mode works in both periods. For example, at 8:00, you set SILENT_MODE_INTERVAL to 8:0-10:0 and SILENT_MODE_DURATION to 240 (4 hours) for the app, the app stays in DND mode during 8:00-12:00 on the current day and 8:00-10:00 in the later days.
  • App
    SILENT_MODE_DURATION Number The DND duration in minutes. The value range is [0,10080], where 0 indicates that this parameter is invalid and 10080 indicates that the DND mode lasts for 7 days.
  • Unlike SILENT_MODE_INTERVAL set as a daily period, this parameter specifies that the DND mode works only for the given duration starting from the current time. For example, if this parameter is set to 240 (4 hours) for the app at 8:00, the DND mode lasts only during 8:00-12:00 on the current day.
  • If both SILENT_MODE_INTERVAL and SILENT_MODE_DURATION are set, the DND mode works in both periods. For example, at 8:00, you set SILENT_MODE_INTERVAL to 8:0-10:0 and SILENT_MODE_DURATION to 240 (4 hours) for the app, the app stays in DND mode during 8:00-12:00 on the current day and 8:00-10:00 in the later days.
  • App and one-to-one and group chat conversations in it

    For both the app and all the conversations in the app, the setting of the DND mode takes precedence over the setting of the push notification mode.

    For example, assume that a DND time period is specified at the app level and the push notification mode of the specified conversation is set to ALL. The DND mode takes effect regardless of the setting of the push notification mode, that is, you do not receive any push notifications during the specified DND time period.

    Alternatively, assume that a DND time period is specified for a conversation, while the app does not have any DND settings and its push notification mode is set to ALL. You do not receive any push notifications from this conversation during the specified DND time period, while the push of all the other conversations remains the same.

    Set the push notifications of an app

    You can call setSilentModeForAll to set the push notifications at the app level and set the push notification mode and DND mode by specifying the SilentModeParam field, as shown in the following code sample:


    _11
    // Sets the push notification mode to `MENTION_ONLY` for an app.
    _11
    SilentModeParam param = new SilentModeParam(SilentModeParam.SilentModeParamType.REMIND_TYPE)
    _11
    .setRemindType(PushManager.PushRemindType.MENTION_ONLY);
    _11
    // Sets the DND duration to 15 minutes.
    _11
    SilentModeParam param = new SilentModeParam(SilentModeParam.SilentModeParamType.SILENT_MODE_DURATION)
    _11
    .setSilentModeDuration(15);
    _11
    // Sets the DND interval from 8:30 to 15:00.
    _11
    SilentModeParam param = new SilentModeParam(SilentModeParam.SilentModeParamType.SILENT_MODE_INTERVAL)
    _11
    .setSilentModeInterval(new SilentModeTime(8, 30), new SilentModeTime(15, 0));
    _11
    // Sets the push notifications at the app level.
    _11
    ChatClient.getInstance().pushManager().setSilentModeForAll(param, new ValueCallBack<SilentModeResult>(){});

    Retrieve the push notification setting of an app

    You can call getSilentModeForAll to retrieve the push notification settings at the app level, as shown in the following code sample:


    _19
    ChatClient.getInstance().pushManager().getSilentModeForAll(new ValueCallBack<SilentModeResult>(){
    _19
    @Override
    _19
    public void onSuccess(SilentModeResult result) {
    _19
    // Retrieves the setting of the push notification mode at the app level.
    _19
    PushManager.PushRemindType remindType = result.getRemindType();
    _19
    // Retrieves the Unix timestamp when the DND duration of an app expires.
    _19
    long timestamp = result.getExpireTimestamp();
    _19
    // Retrieves the start time specified in the DND interval at the app level.
    _19
    SilentModeTime startTime = result.getSilentModeStartTime();
    _19
    startTime.getHour(); // The start hour of the DND interval.
    _19
    startTime.getMinute(); // The start minute of the DND interval.
    _19
    // Retrieves the end time specified in the DND interval at the app level.
    _19
    SilentModeTime endTime = result.getSilentModeEndTime();
    _19
    endTime.getHour(); // The end hour of the DND interval.
    _19
    endTime.getMinute(); // The end minute of the DND interval.
    _19
    }
    _19
    @Override
    _19
    public void onError(int error, String errorMsg) {}
    _19
    });

    Set the push notifications of a conversation

    You can call setSilentModeForConversation to set the push notifications for the conversation specified by the conversationId and ConversationType fields, as shown in the following code sample:


    _8
    // Sets the push notification mode to `MENTION_ONLY` for a conversation.
    _8
    SilentModeParam param = new SilentModeParam(SilentModeParam.SilentModeParamType.REMIND_TYPE)
    _8
    .setRemindType(PushManager.PushRemindType.MENTION_ONLY);
    _8
    // Sets the DND duration to 15 minutes.
    _8
    SilentModeParam param = new SilentModeParam(SilentModeParam.SilentModeParamType.SILENT_MODE_DURATION)
    _8
    .setSilentDuration(15);
    _8
    // Sets the push notifications at the conversation level.
    _8
    ChatClient.getInstance().pushManager().setSilentModeForConversation(conversationId, conversationType, param, new ValueCallBack<SilentModeResult>(){});

    Retrieve the push notification setting of a conversation

    You can call getSilentModeForConversation to retrieve the push notification settings of the specified conversation, as shown in the following code sample:


    _15
    ChatClient.getInstance().pushManager().getSilentModeForConversation(conversationId, conversationType, new ValueCallBack<SilentModeResult>(){
    _15
    @Override
    _15
    public void onSuccess(SilentModeResult result) {
    _15
    // Checks whether the push notification mode is set for the specified conversation.
    _15
    boolean enable = result.isConversationRemindTypeEnabled();
    _15
    // Retrieves the setting of the push notification mode for the specified conversation.
    _15
    if(enable){
    _15
    PushManager.PushRemindType remindType = result.getRemindType();
    _15
    }
    _15
    // Retrieves the Unix timestamp when the DND duration of a conversation expires.
    _15
    long timestamp = result.getExpireTimestamp();
    _15
    }
    _15
    @Override
    _15
    public void onError(int error, String errorMsg) {}
    _15
    });

    Retrieve the push notification settings of multiple conversations

    1. You can retrieve the push notification settings of up to 20 conversations at each call.
    2. If a conversation inherits the app setting or its push notification setting has expired, the returned dictionary does not include this conversation.

    You can call getSilentModeForConversations to retrieve the push notification settings of multiple conversations, as shown in the following code sample:


    _6
    ChatClient.getInstance().pushManager().getSilentModeForConversations(conversationList, new ValueCallBack<Map<String, SilentModeResult>>(){
    _6
    @Override
    _6
    public void onSuccess(Map<String, SilentModeResult> value) {}
    _6
    @Override
    _6
    public void onError(int error, String errorMsg) {}
    _6
    });

    Clear the push notification mode of a conversation

    You can call clearRemindTypeForConversation to clear the push notification mode of the specified conversation. Once the specific setting of a conversation is cleared, this conversation inherits the app setting by default.

    The following code sample shows how to clear the push notification mode of a conversation:


    _1
    ChatClient.getInstance().pushManager().clearRemindTypeForConversation(conversationId, conversationType, new CallBack(){});

    Set up display attributes

    Set the display attributes of push notifications

    You can call updatePushNickname to set the nickname displayed in your push notifications, as shown in the following code sample:


    _1
    ChatClient.getInstance().pushManager().updatePushNickname("pushNickname");

    You can also call updatePushDisplayStyle to set the display style of push notifications, as shown in the following code sample:


    _5
    // `SimpleBanner` indicates that only "You have a new message" displays.
    _5
    // To display the message content, set `DisplayStyle` to `MessageSummary`.
    _5
    PushManager.DisplayStyle displayStyle = PushManager.DisplayStyle.SimpleBanner;
    _5
    // An asynchronous processing is required for this method.
    _5
    ChatClient.getInstance().pushManager().updatePushDisplayStyle(displayStyle);

    Retrieve the display attributes of push notifications

    You can call getPushConfigsFromServer to retrieve the display attributes in push notifications, as shown in the following code sample:


    _5
    PushConfigs pushConfigs = ChatClient.getInstance().pushManager().getPushConfigsFromServer();
    _5
    // Retrieves the nickname displayed in push notifications.
    _5
    String nickname = pushConfigs.getDisplayNickname();
    _5
    // Retrieves the display style of push notifications.
    _5
    PushManager.DisplayStyle style = pushConfigs.getDisplayStyle();

    Set up push translations

    If a user enables the automatic translation feature and sends a message, the SDK sends both the original message and the translated message.

    Push notifications work in tandem with the translation feature. As a receiver, you can set the preferred language of push notifications that you are willing to receive when you are offline. If the language of the translated message meets your setting, the translated message displays in push notifications; otherwise, the original message displays instead.

    The following code sample shows how to set and retrieve the preferred language of push notifications:


    _5
    // Sets the preferred language of push notifications.
    _5
    ChatClient.getInstance().pushManager().setPreferredNotificationLanguage("en", new CallBack(){});
    _5
    _5
    // Retrieves the preferred language of push notifications.
    _5
    ChatClient.getInstance().pushManager().getPreferredNotificationLanguage(new ValueCallBack<String>(){});

    Set up push templates

    Chat allows users to use ready-made templates for push notifications.

    You can create and provide push templates for users by referring to the following steps:

    1. Log in to Agora Console, and click Project Management in the left navigation bar.

    2. On the Project Management page, locate the project that has Chat enable and click Config.

    3. On the project edit page, click Config next to Chat.

    4. On the project config page, select Features > Push Template and click Add Push Template, and configure the fields in the pop-up window, as shown in the following figure:

    1655445229699

    Once the template creation is complete in Agora Console, users can choose this push template as their default layout when sending a message, as shown in the following code sample:


    _28
    // This code sample takes a TXT message as an example. You can use the same approach to set IMAGE messages and FILE messages.
    _28
    ChatMessage message = ChatMessage.createSendMessage(ChatMessage.Type.TXT);
    _28
    TextMessageBody txtBody = new TextMessageBody("message content");
    _28
    message.setTo("6006");
    _28
    // Sets the push template created in Agora Console as their default layout.
    _28
    JSONObject pushObject = new JSONObject();
    _28
    JSONArray titleArgs = new JSONArray();
    _28
    JSONArray contentArgs = new JSONArray();
    _28
    try {
    _28
    // Sets the template name.
    _28
    pushObject.put("name", "test7");
    _28
    // Sets the template title by specifying the variable.
    _28
    titleArgs.put("value1");
    _28
    //...
    _28
    pushObject.put("title_args", titleArgs);
    _28
    // Sets the template content by specifying the variable.
    _28
    contentArgs.put("value1");
    _28
    //...
    _28
    pushObject.put("content_args", contentArgs);
    _28
    } catch (JSONException e) {
    _28
    e.printStackTrace();
    _28
    }
    _28
    // Adds the push template to the message.
    _28
    message.setAttribute("em_push_template", pushObject);
    _28
    // Sets the message callback.
    _28
    message.setMessageStatusCallback(new CallBack() {...});
    _28
    // Sends the message.
    _28
    ChatClient.getInstance().chatManager().sendMessage(message);

    What's next

    This section includes more versatile push notification features that you can use to implement additional functions if needed.

    If the ready-made templates do not meet your requirements, Chat also enables you to customize your push notifications.

    Custom fields

    The following code sample shows how to add an extension field in push notifications:


    _20
    // This code sample takes a TXT message as an example. You can use the same approach to set IMAGE messages and FILE messages.
    _20
    ChatMessage message = ChatMessage.createSendMessage(ChatMessage.Type.TXT);
    _20
    TextMessageBody txtBody = new TextMessageBody("message content");
    _20
    // Specifies the username of the receiver.
    _20
    message.setTo("toChatUsername");
    _20
    // Sets the extension object.
    _20
    JSONObject extObject = new JSONObject();
    _20
    try {
    _20
    extObject.put("test1", "test 01");
    _20
    } catch (JSONException e) {
    _20
    e.printStackTrace();
    _20
    }
    _20
    // Adds the extension object.
    _20
    message.setAttribute("em_apns_ext", extObject);
    _20
    // Sets the message body.
    _20
    message.addBody(txtBody);
    _20
    // Sets the message callback.
    _20
    message.setMessageStatusCallback(new CallBack() {...});
    _20
    // Sends the message.
    _20
    ChatClient.getInstance().chatManager().sendMessage(message);

    ParameterDescription
    txtBodyThe content of the text message.
    toChatUsernameThe username of the receiver.
    em_apns_extThe custom key used to add the extension field.
    Note: Do not modify the key. Modify the value of the key only.

    The following example shows a RemoteMessage object received by the remote user:


    _9
    {
    _9
    "message":{
    _9
    "token":"bk3RNwTe3H0:CI2k_HHwgIpoDKCIZvvDMExUdFQ3P1...",
    _9
    "data":{
    _9
    "alert" : "message content",
    _9
    "test1" : "test 01"
    _9
    }
    _9
    }
    _9
    }

    ParameterDescription
    dataThe custom data of the push notification.
    alertThe displayed content of the push notification. This value varies based on the setting of DisplayStyle.
    test1The custom field of the push notification.

    Custom displays

    The following code sample shows how to customize the display style in push notifications:


    _21
    // This code sample takes a TXT message as an example. You can use the same approach to set IMAGE messages and FILE messages.
    _21
    ChatMessage message = ChatMessage.createSendMessage(ChatMessage.Type.TXT);
    _21
    TextMessageBody txtBody = new TextMessageBody("message content");
    _21
    // Specifies the username of the receiver.
    _21
    message.setTo("toChatUsername");
    _21
    // Sets the custom push notifications.
    _21
    JSONObject extObject = new JSONObject();
    _21
    try {
    _21
    extObject.put("em_push_title", "custom push title");
    _21
    extObject.put("em_push_content", "custom push content");
    _21
    } catch (JSONException e) {
    _21
    e.printStackTrace();
    _21
    }
    _21
    // Adds the extension field.
    _21
    message.setAttribute("em_apns_ext", extObject);
    _21
    // Sets the message body.
    _21
    message.addBody(txtBody);
    _21
    // Sets the message callback.
    _21
    message.setMessageStatusCallback(new CallBack() {...});
    _21
    // Sends the message.
    _21
    ChatClient.getInstance().chatManager().sendMessage(message);

    ParameterDescription
    toChatUsernameThe username of the sender.
    em_apns_extThe custom key used to add the extension field.
    Note: Do not modify the key. Modify the value of the key only.
    em_push_titleThe custom key used to specify the custom titles of push notifications.
    Note: Do not modify the key. Modify the value of the key only.
    em_push_contentThe custom key used to specify the custom displayed content of push notifications.
    Note: Do not modify the key. Modify the value of the key only.

    The following example shows a RemoteMessage object received by the remote user:


    _10
    {
    _10
    "message":{
    _10
    "token":"bk3RNwTe3H0:CI2k_HHwgIpoDKCIZvvDMExUdFQ3P1...",
    _10
    "data":{
    _10
    "alert" : "push content",
    _10
    "push_title" : "custom push title",
    _10
    "push_content" : "custom push content"
    _10
    }
    _10
    }
    _10
    }

    ParameterDescription
    dataThe custom data of the push notification.
    alertThe displayed content of the push notification. This value varies based on the setting of DisplayStyle.
    push_titleThe custom title of the push notification.
    push_contentThe custom content of the push notification.

    Force push notifications

    Once you force a push notification to a user, the user receives the message regardless of their settings on the push nosh notification and DND modes.

    The following code sample shows how to force a push notification:


    _11
    // This code sample takes a TXT message as an example. You can use the same approach to set IMAGE messages and FILE messages.
    _11
    ChatMessage message = ChatMessage.createSendMessage(ChatMessage.Type.TXT);
    _11
    TextMessageBody txtBody = new TextMessageBody("test");
    _11
    // Sets the username of the receiver.
    _11
    message.setTo("toChatUsername");
    _11
    // Sets the custom extension field.
    _11
    message.setAttribute("em_force_notification", true);
    _11
    // Sets the message callback.
    _11
    message.setMessageStatusCallback(new CallBack() {...});
    _11
    // Sends a message.
    _11
    ChatClient.getInstance().chatManager().sendMessage(message);

    ParameterDescription
    txtBodyThe message body.
    toChatUsernameThe username of the receiver.
    em_force_notificationWhether to force a push notification.
  • true: Yes
  • false: No
  • vundefined